Nail art is a huge trend right now, and there are so many different creative designs out there.
Whether you prefer subtle styles or something bolder, here are eight beautiful nail art designs to inspire you.
Mermaid Nails
https://www.instagram.com/p/BhcCJ-CAafi/?taken-by=nailartbyfrida
Mermaid-inspired nails are such a fun, whimsical style, and are not actually that difficult to create.
Begin by applying a light colored, glittered nail polish to your nails.
Not sure which color to use?
A light purple or a light pink always work well with this style.
Then, paint the tip of a sponge with a glittery blue nail polish. Dab this onto your nails in three places, one on a top corner, one on the bottom corner of the same side, and then one at the side of your nail, at the opposite side of the other two dabs.
Apply a clear coat to seal this in. Then, dip a thin brush into white nail polish, and start drawing on the scales. The easiest way to do this is by drawing on a small M-shape at the base of your nail, and then continuing upwards with the rest of the scales.
Once you’re done, fill in two or three of the scales with your white nail polish.
Dip a Q-tip into some nail polish remover to clean up any smudges at the sides of your nails or on your fingers.
Finish off this quirky design with a top coat.
Ombre Nails
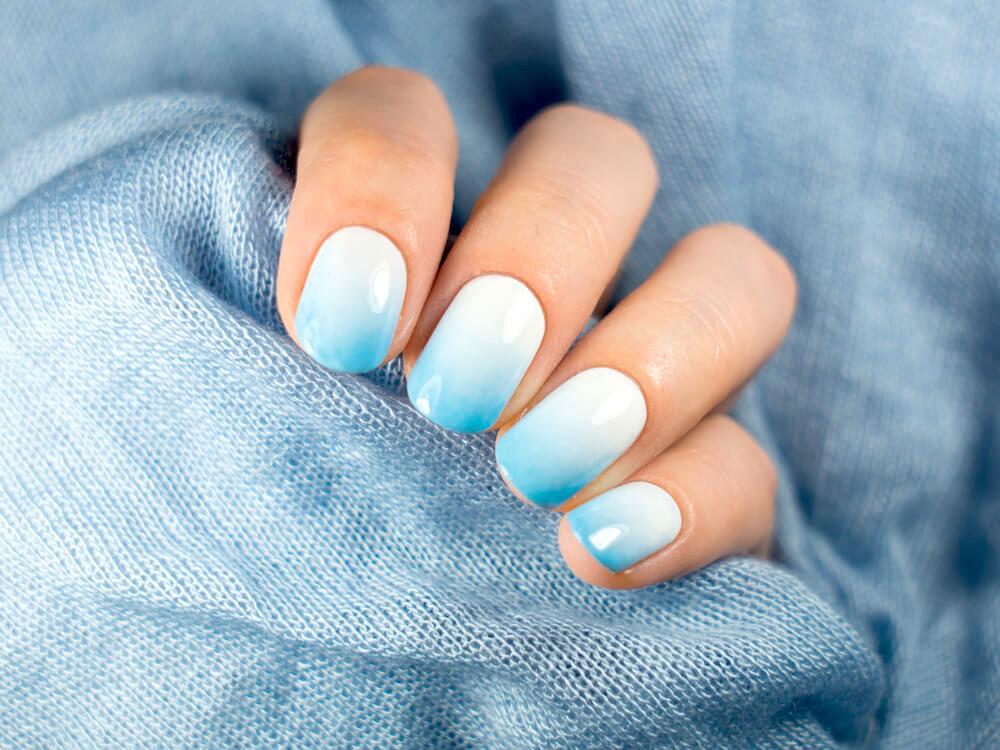
Ombre hair has been all the rage recently, so it is no surprise that this trend has now taken over nail art too.
Wondering what ombre is?
It refers to having different shades of a color that gradually blend into each other, going from light to dark.
Here are the tools that you will need to create this style:
- A base nail polish
- A blue nail polish
- A white nail polish
- A sponge
- Toothpicks
- A plastic sheet, or some baking paper or tin foil
- A Q-tip
- Nail polish remover
Ready to get started?
Begin with your base coat, and then follow this up with a layer of white nail polish.
Lay your plastic sheet out on a flat surface, and then paint on a generous amount of both the blue and the white nail polishes, making sure that they are just about touching at the edges.
Use a toothpick to swirl the two colors together at the point at which they meet. This is the part that makes a huge difference to the gradient of your final colors. If you want a longer, more subtle, gradient, mix together a larger section of the two colors, whereas if you want more of a dramatic fade, mix together a smaller amount.
Dab your sponge directly onto the polish a few times before dabbing this onto your nails. Keep doing this gently, slowly moving up and down your nail to spread the color. This is a step that you can repeat as many times as you need to, so long as the layers of polish have dried before you apply the next.
Finish off with a top coat. You may need more than one layer in order to smooth out the texture that the sponge has created, especially if you carried out the previous step a few times.
Dip the Q-tip into the nail polish remover and use this to clean up any excess nail polish.
Ombre nails work so well with just about any color, so have fun experimenting with different combinations.
Patriotic Nails
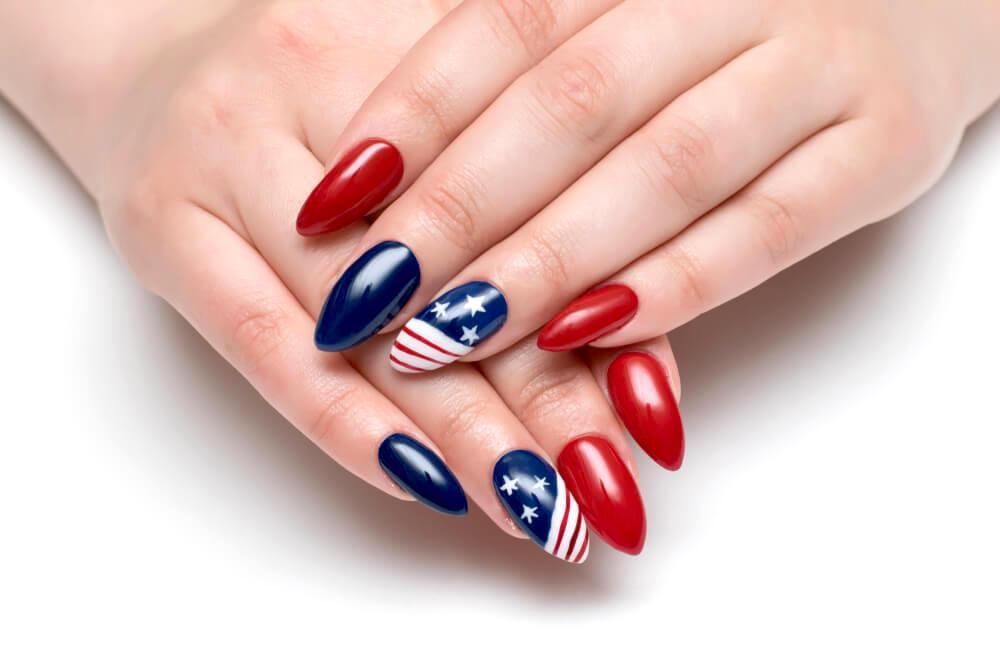
Want to show the world how much you love your country?
Let your nails do the talking!
This fun design features the American flag, but, if you are feeling creative, you would likely be able to paint on just about any country’s flag.
Here are the steps to follow:
- Begin with a base coat
- Decide where you want your stripes to be, and then apply a stencil to block this area off
- Paint the base of your nails blue, stopping at the stencil
- Remove the stencil. Once your nails have dried, apply the stencil to the blue part of your nails, and paint the top half white
- Once the white has dried, apply your stencils diagonally over the white nail polish, creating thin stripes
- Use the red nail polish to paint in between the stencils, before removing them
- When it comes to the white stars, you have two options. Your first is to paint these stars on freehand, which will only work if you have a steady hand. Alternatively, you could purchase white star nail stickers, and then apply these on to your nails
- Finish off with a top coat to seal everything in place
Black and Gold
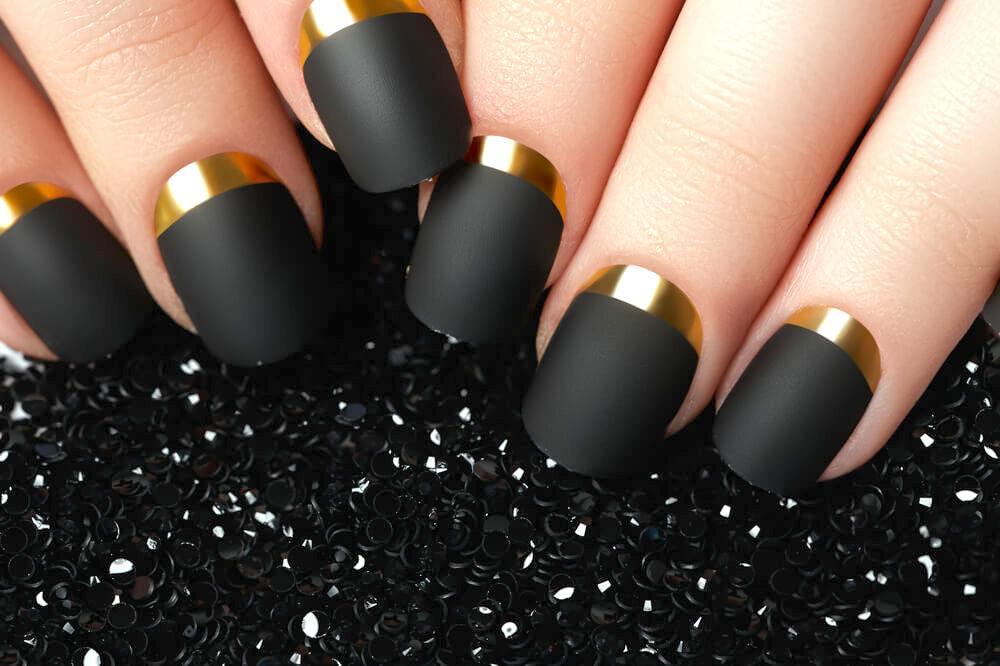
Black and gold is such a classic color combination, and is perfect for when you need a more dramatic nail design.
By going with a glossy gold and a matte black, you will be keeping this look toned down enough to make it suitable for a wide variety of occasions.
This is actually an extremely easy look to create, as all you will need is black nail polish, gold nail polish, and a nail stencil.
Begin with a base coat, and then once this has dried, apply the stencil to the base of your nails.
Use a matte black nail polish to paint your nails, doing two or three coats if you would prefer a deeper color.
Remove the stencil, and then once the black has dried, apply it just above the bare part of your nails.
Use a glossy gold nail polish to paint the base of your nails, before removing the stencil.
Finish the look with a top coat.
Chevron Nails
![]()
Chevron patterns are so stylish and modern, making this a great one for your nails.
It is completely up to you whether you decide to create the pattern on just a couple of your nails, or go all out and do them on all of your nails.
Whichever you choose to do, there are two ways in which you can create chevron nail art…
The first is by drawing the lines on freehand.
If you would like to give this a try, follow these steps:
- Paint your nails with a base coat, and then apply a layer of white nail polish
- Dip a thin brush into some blue nail polish, and paint four small dots down the center of your nail, in a vertical pattern, with about a quarter of an inch between them. The top dot should be hitting the edge of your nail
- Add four more dots going vertically across your nail, placing them in a way that aligns them with your center dots
- Draw short diagonal lines between the dots, so that you create three upside down V-shapes on your nails
- Then, carry on drawing lines across your nails, so that you create a zig zag effect
- Once your nails have dried, use a Q-tip dipped in nail polish remover to clear away any smudges
- Finish off with a layer of top coat
Not confident enough in your freehand abilities?
Fortunately, there is another way to create chevron nail art, and this is with the use of tape.
You will need multiple thin strips of tape for this, with each one being slightly longer than the width of your fingers.
Use zig zag craft scissors to cut out zig zags in the strips of tape. It helps to work out how many zig zags you will actually need, so that you do not run out of tape halfway through the process.
Begin with a base coat, and then follow this up with a couple of layers of white nail polish.
Apply the tape to your nails, once they have dried, smoothing this down firmly to ensure that there are no air bubbles trapped beneath.
Use the blue nail polish to paint your nails over the tape, and then remove the tape while your nails are still wet.
Wondering why you should remove the tape while your nails are wet, rather than once they have dried?
Because if you remove it after they have dried, you risk chipping off some of the top color.
Once your nails have dried, apply a top coat to lock all of your layers in.
Leopard Print
https://www.instagram.com/p/Bf_CeUgg4x6/?taken-by=nailartbyfrida
Animal prints are always popular, and this leopard print design makes use of gold leaf, which really elevates the entire look.
Want to give this style a try?
It is actually quite easy:
- Begin with a base coat, and then follow this up with a couple of layers of white nail polish
- Carefully remove small amounts of gold leaf from its packaging, using tweezers to ensure that they stay smooth and flat
- Carefully place a couple of pieces of gold leaf onto each nail with your tweezers, before using your fingers to smooth this down
- Use a thin brush to create the rest of the leopard print. The easiest way to do this is by painting on small U-shapes, as well as oval dots
- Finish the design with a layer of top coat
French-Tipped Polka Dots
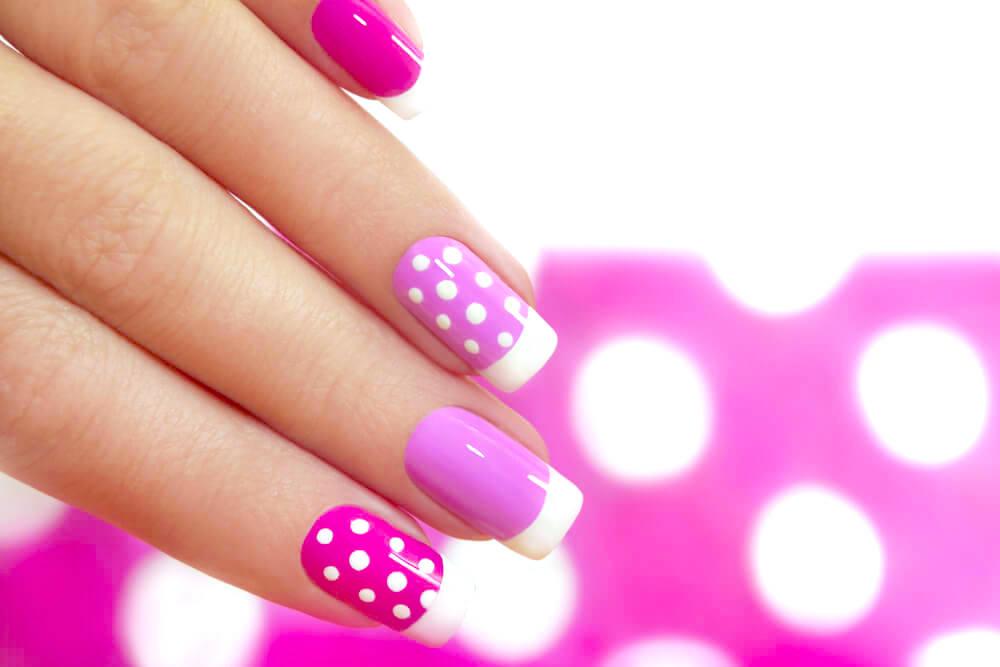
A classic French manicure never gets old, but this design takes the style a bit further by incorporating shades of pink, as well as polka dots on a couple of nails.
If you already know how to do a French manicure, then this is a design that will be easy for you to pull off.
Rather than opting for a clear coat for your nails before applying your white tips, choose various shades of pink, or any other color that you would prefer to use.
When it comes to creating the polka dots…
You have a couple of options. The first is to use a nail dotter, which is a tool specifically designed for creating dots and other similar shapes in nail art. All you need to do is dip this into your white nail polish and then dot this onto your nails, using different sized dots for extra variety.
Don’t have a nail dotter?
That’s no problem, as you likely have a few other items lying around the house that you can use instead. Try using the tip of a bobby pin, a Q-tip, or even a toothpick, although you will need to file the toothpick down a bit so that the tip is rounder rather than pointier.
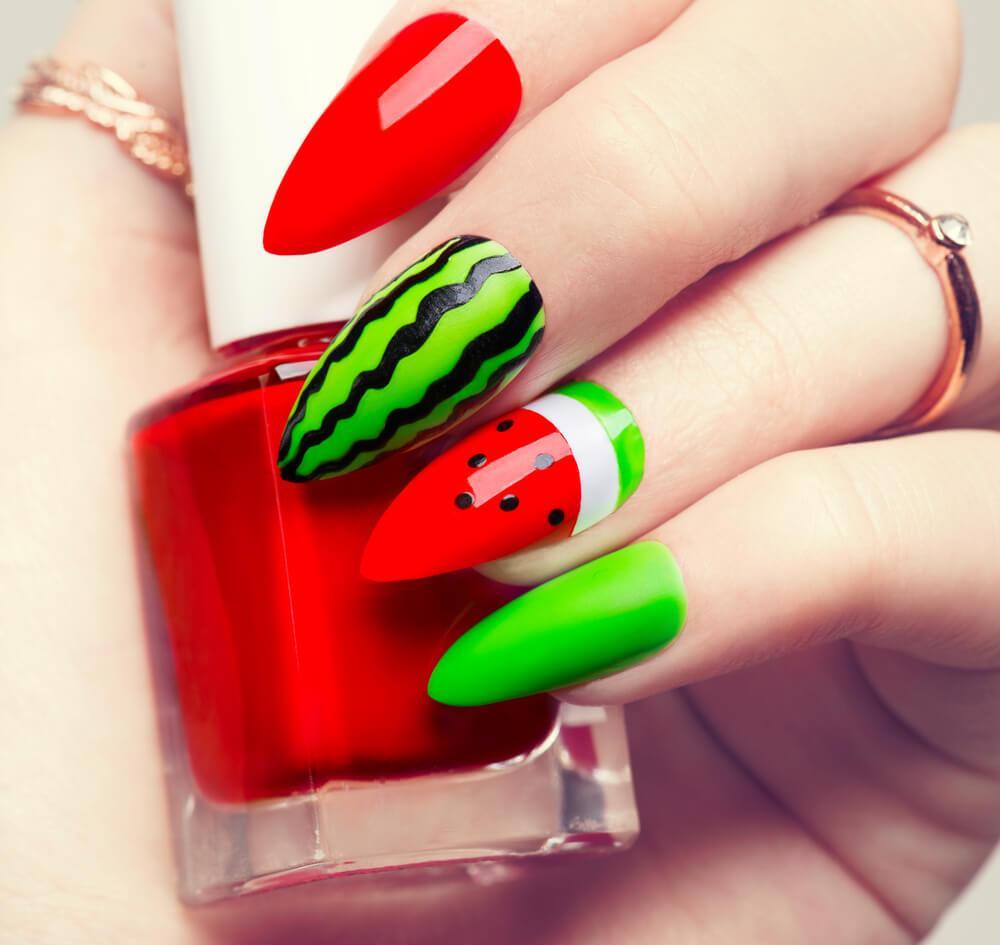
Fruity Nails
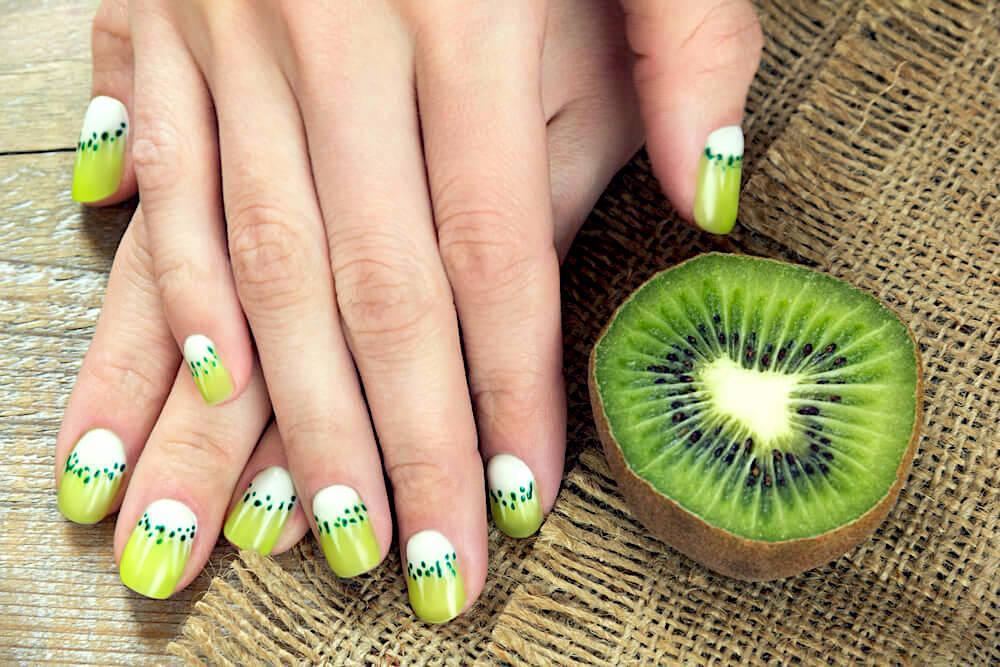
Do you love fruit?
If so, this design is perfect for you. This particular design has been inspired by a kiwi fruit, but, if you are feeling creative, you can replicate just about any fruit you want on your nails.
For the kiwi design, begin with a base coat, and then apply a layer of white nail polish over this.
Use a light green nail polish to paint the top half of each nail, making sure that the ends form a curve rather than a straight line, as this is more in-keeping with the organic nature of fruit.
Take a darker green nail polish and dip a nail dotter into this, before dotting it onto your nails, to create the “seeds” of the kiwi.
Finish off the design with a layer of top coat.
Don’t like kiwi?
That’s ok, because there are so many other fruit-inspired nail art designs out there that you can take ideas from. Try replicating a watermelon pattern, or even a strawberry or an orange.
There is so much artistic creativity involved in nail art, but even if you are not a very creative person, the majority of these designs are still easy to put together. From fruit-inspired nails to modern chevron patterns, nail art is such a great way to make your nails stand out, and will add a whole new dimension to your outfit.

Leave A Comment