
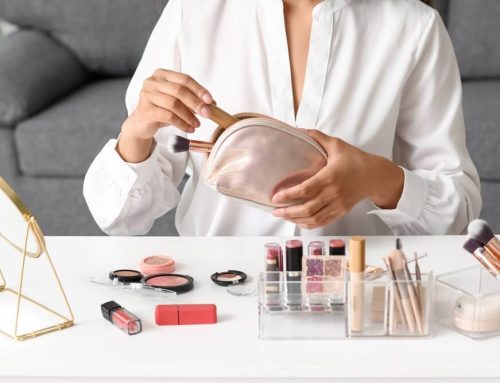
During the holidays, you’ll be attending festive events and reunions. You will want to look your best during these social gatherings, so naturally, you’ll be planning your fashion.
When it comes to picking an overall look, makeup and clothing can be the easiest part of the dress-up challenge. These two you can change anytime, but nail art is something you have to choose carefully because you can only change your nail art once every two weeks.
Thus, you have to choose early on which nail art would best go with your wardrobe. You also have to take into consideration the formality and theme of the event. So, we’re here to help you find some elegant nail art ideas for this year’s Thanksgiving.
Choosing a Design
Before choosing a design, you have to know what elegance means to you. It can be a simple and minimalist look to make you sophisticated. Or it can also be an intricate and detailed design for a more playful and unique look.
Glossy Nude Colors
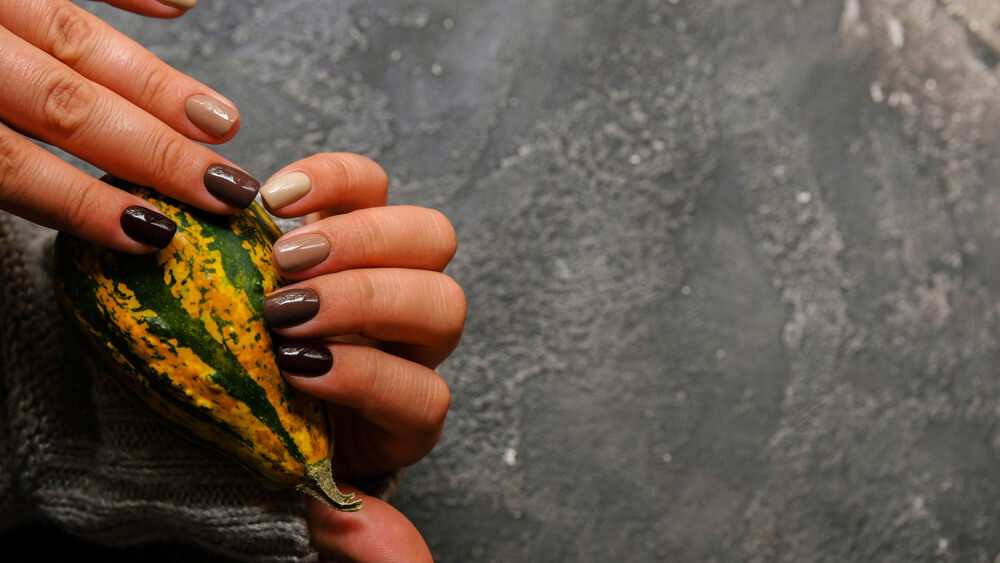
If you want to talk about elegance, then earth colors are the simplest. These are minimalist in style yet still manage to look sophisticated and regal.
True, the holidays are a festive celebration, and you may feel like this simple look can be underwhelming. But think again about what the holidays really mean. After all, Thanksgiving started as a tradition to celebrate harvest day and the bounty of the land.
The best part about this nail art idea?
The colors are neutral!
Thus, you can easily match your clothing style with your nails. You can wear neutral colors as well, or you can sport off-white outfits with a tiny hint of color.
With its diverse shades of light to dark nudes, you’ll quickly find colors to match your skin.
The simple design also helps you quickly do this nail art idea by yourself! Just go out and buy these colors. Here are some ways to add a twist to this nail art:
- Use a glittery finish for a grainy look.
- Swap the color order on your other hand for contrast.
- Add white accents at the top or bottom of the nails.
Neutrals with Glitter
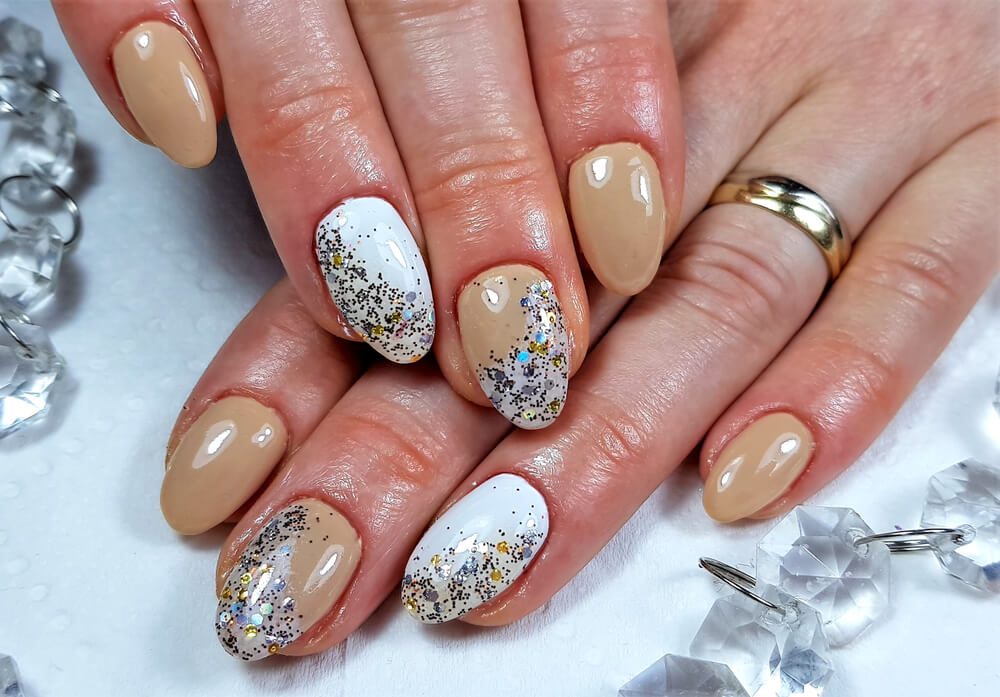
When imitating this nail art, it’s best if you follow an oval or almond shape for your nails.
But beware of these nail shapes!
First, you have to learn how to prevent broken nails. Breaking your nails’ tips can ruin the look, especially since the glitter accents are at the top.
Light neutrals, such as nudes and whites, go perfect with some metallic glitter. With this nail art, you can celebrate both the earth, for its precious blessings, and the snowy season.
This design is yet another simple but elegant nail art with only three types of nail polish used. So, choose a nude to go well on your skin. Then, find something white or off-white to complement the nude nail polish.
You can pick the ring finger for the white base, while all other fingernails have the light nude color. You can also play around with it by coloring your pinky or middle fingernails with white as well.
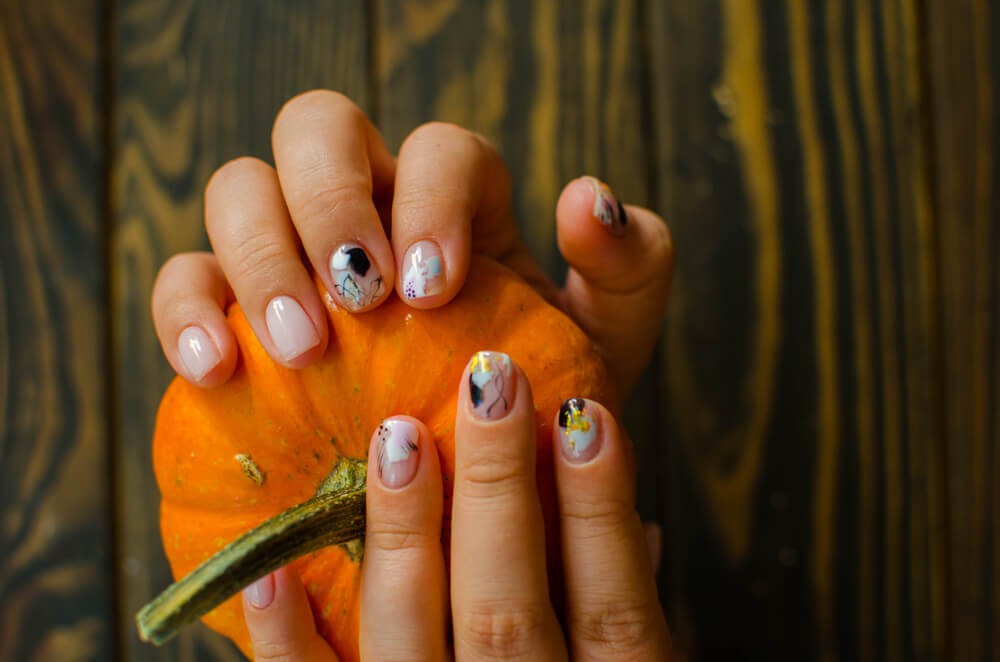
Marbled Pumpkin
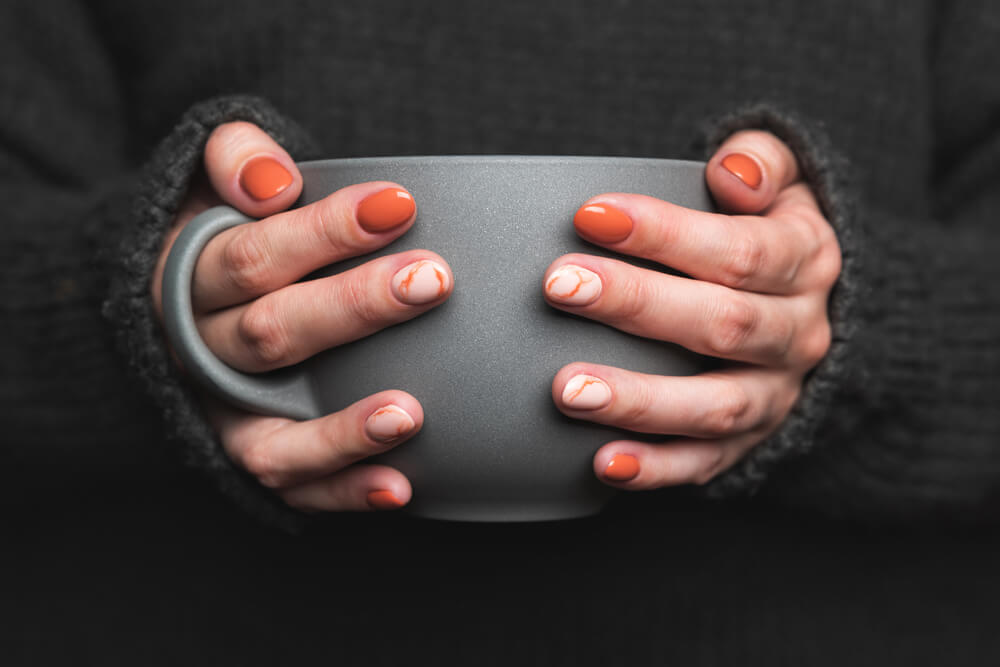
Thanksgiving is as much as a celebration of harvest as it is of food. So if you want to match the food you’re bringing for the potluck, then the pumpkin marble’s perfect for you.
The orange tone is a great way to lift the mood as it represents optimism, warmth, and enthusiasm.
This nail art is a combination of squash, peach, and white. Here, you can color most of your fingernails with squash or any light to medium orange shades.
Then, to add some elegance, you can paint one to two nails of each hand white, marbled with peach or tangerine shades. If you want something simpler, you can also color only one nail per hand with the marbled design. We suggest leaving your ring finger for such an elegant design!
Just make sure you choose the muted orange hues! Bright shades of orange may look too flashy. Here are the brighter shades of orange you should avoid to maintain a neutral look:
- Tiger
- Coral
- Fire
- Neon orange
Instead, lean onto the tangerines and gingers. These colors will help you choose your outfits easier because they’re more toned down.
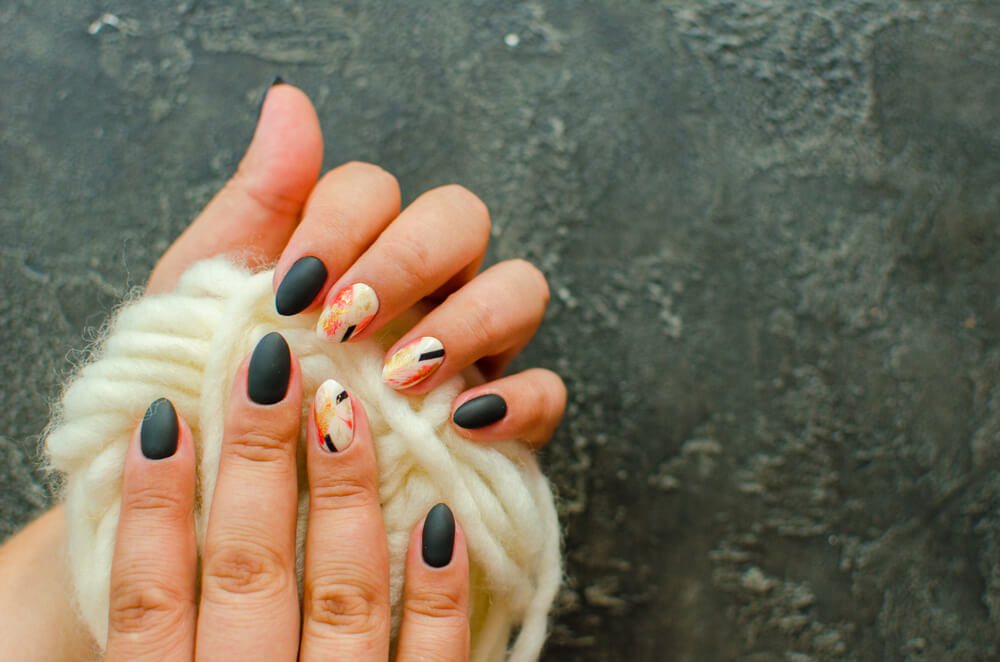
Waved Stripes
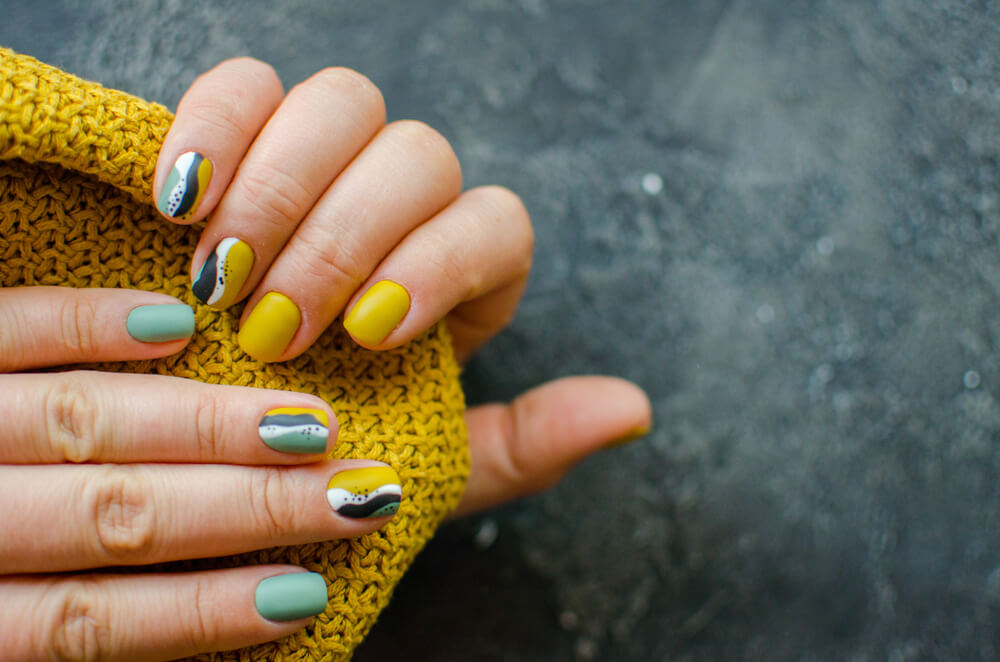
This nail art has spots and waves resembling a pumpkin’s skin, but only with different colors.
It has a muted and mustard-like yellow with light turquoise and cadet blue in a matte finish. These are the primary colors you should use for most of your fingernails. You can even have a play of color by having mostly yellow nail polish on the one hand. Then, paint the other turquoise.
The best thing about this nail art is it has a playful side. It also has black and white in some of the waved stripes. The specks and black dots also add a nice touch to the waves.
Remember to keep the playful waves to a maximum of two fingernails per hand to preserve the elegance of the look.
Choose your ring finger or pinky if you want to go with only one waved nail per hand. And if you’re going to have more of the wavy design, be sure to pick adjacent fingers. Just don’t pair the thumb and pointer, of course! This tip will make you look posh, reminiscent of the fun summer nail art trend.
What makes this an excellent Thanksgiving idea is it can match green and yellow colors for your brighter late-autumn outfits.
Dark and Enchanting Blues
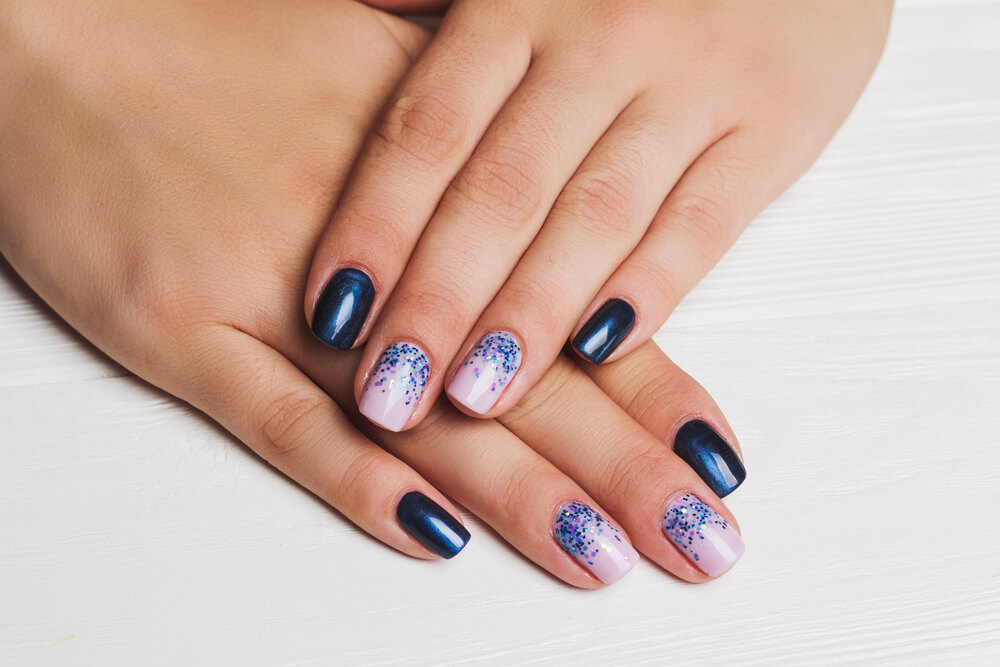
The look alone can be mesmerizing and enchanting to others. The contrast of the dark navy blue with the light lavender and purple glitters makes your nails look like a fancy lakeside gala.
You can imitate this look by getting a navy blue nail polish with a half-glossy, half-creme finish. This color gives you depth and lends a sense of sophistication to your nail art.
Then, find a lavender or lilac nail polish for the other fingers. Bright colors such as these will counterbalance the intimidating, dark colors. Plus, the glitter will add to the overall look.
Although navy blue and lilac are the best hues for the look, you can also try different colors. Here are some other color pairs you can use to achieve an elegant look with this nail art:
- Romantic palette: classic blue and blush pink
- Elegant palette: dark blue and gold
- Midnight palette: dark violet (eggplant) and silver
Just make sure the glitter matches the feel of the two base colors. Else the nail art would look too skittish.
Gift Wraps
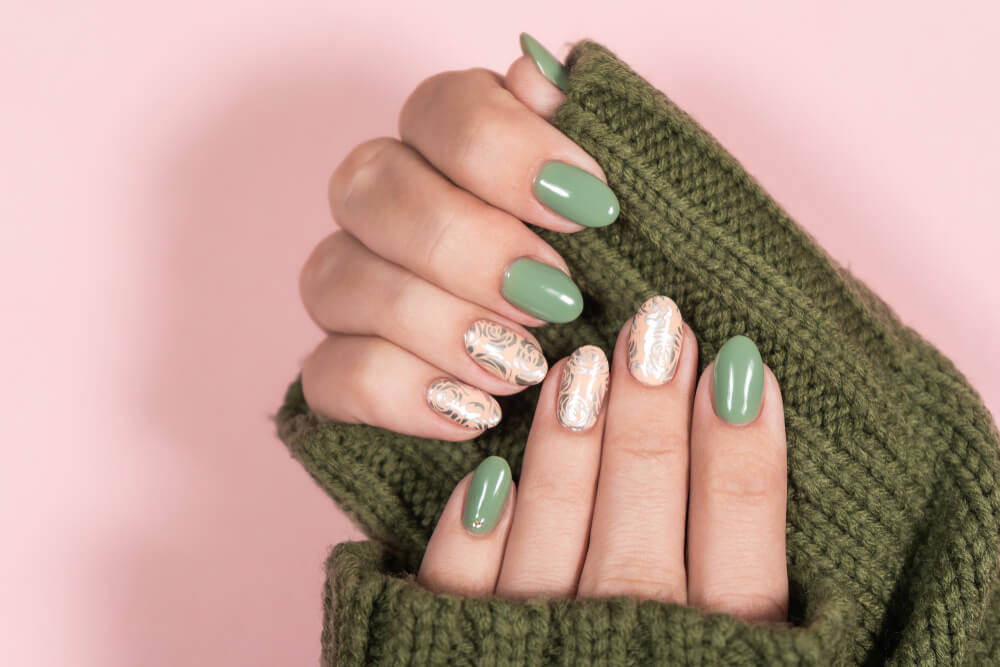
For this creative nail art idea, you can put the gift design on just one finger. Pick out two base colors and one for the pattern design. It would be best for you to choose nail polish with a creme coating for the base. As for the gift wrapper design, you can use nail polish with a metallic finish.
You can follow this suggestion as it is, with a light forest green base and a pastel pink top. Then, follow the gift wrap design with a pattern of roses in metallic silver.
For this nail art, you can easily experiment with the base colors!
Try out different palettes by taking nail polish bottles. Put them side by side, examine the dynamics of the colors together, and judge if they’re a good fit. You can try looking for your color palettes online to help you choose more quickly.
Darker base shades can also go with this design. But make sure it’s not so dark to the point the patterns become blinding.
You can even choose a pattern apart from roses! Try out other simple yet elegant designs you can see in patterned wallpapers or gift wrappers.
- Leaves
- Snowflakes
- Swirls
- Bougainvilleas
As long as you have a metallic finish for the design, your nail art will surely stand out!
Dark Strokes in Pastel
This light and artistic look is perfect for those who dress in pastels during the holidays. The base is in a light pink shade with a pearl finish to add a natural look to your nails.
To achieve an airy feel, ask your nail technician to create light strokes of black and white. Make sure the strokes are thin, much like wisps of smoke. Once done, the curves should look as if they’re moving in a particular direction while fading at the same time.
Then, you can add some greens and whites — and even some glitter!
If you want to have other colors, you can always find different color palettes, as mentioned before. This nail art would look best with a pastel base paired with a contrasting color for design.
Your nail technician can paint these additional colors as faint smears on your nails. The overall effect would look like having a sophisticated yet unfinished impressionist painting on your fingers.
A Modern Look
This design is yet another matte-finished nail art. The base for most fingernails complements the single white fingernail with geometric shapes and light stains.
If you get this design right, your designed fingernail can look like a confetti display. You can even make the design look embossed on your fingers. To add some texture to your nails, you can also use glossy or metallic finishes for the light yellow streaks.
This design is also suitable for those residual Halloween feels you may still have after sporting the best Halloween looks.
Winter Wonderland

Lastly, to welcome the upcoming cold winter days, try out this gradient and snowy nail art. The bottom part of the nails is a light pink color. As you go up the nails, you can see it transition to a turquoise blue shade.
At the gradient spot, you can also add some white glitter to add a snowy effect. But the main design here is the white snowflakes on each finger. You can add one big snowflake with smaller ones near it.
And if you’re up for a challenge . . .
Then you should try out different snowflake designs per finger!
After all, each fallen snowflake is unique, with a different ice crystal pattern. A glossy finish will also add to the sparkly overall effect of the nail art.
Choosing the Nail Shape
As you may already know, there are numerous nail shapes you can choose from before getting a mani or pedi. Here’s a list of the nail shapes, starting from the sharpest to the bluntest.
- Stiletto
- Ballerina
- Almond
- Square
- Squared oval/Squoval
- Round/Oval
Experts suggest you pick a nail shape according to the shape of your cuticles. But if you want to explore, then why not? You can even choose a nail shape according to the latest winter makeup trends.
The longer shapes make your fingers appear longer and thinner. Stilettos, as sharp as they may be, are cool to wear for special events. Ballerina is also a good shape if you want to try out something new. But if you’re planning something long-term during the holidays, you can go with the almond among the long shapes.
Shorter shapes can arguably be the best holiday shapes, especially since the holidays are a time for hugs and cooking. Squares look better in dark and geometric nail art designs, while ovals are suitable for bold colors. Ovals also look more feminine compared to other nail shapes.
Whichever you choose among these shapes, make sure you can live with it during the holidays. The same goes for your desired nail art, of course!
Just remember: you’ll be bonding more than ever with your family this time of the year. Thanksgiving is about cooking tons of food for your family, so you have to ensure your fingers are clean. Check out the best non-toxic nail polish brands and find the colors you need. Then, you won’t have to worry about making pie dough or stuffed turkey with painted nails!
Any of these nine designs will surely help you maintain an elegant aura, even during a tight-knit occasion. Now that you’ve got the ideas, just pick the color and head to your technician’s station for your nail art. You can also consult them for the colors you’ve chosen since they are experts in nail designing.
Leave A Comment